
Table of Contents
Introduction
Learning how to create PHP project in XAMPP is one of the first steps for beginners who want to start PHP web development. XAMPP provides Apache, PHP, and MySQL, allowing you to build and test PHP applications directly on your Windows computer.
In this tutorial, you will learn how to create PHP project in XAMPP and run it on your local Windows computer.
In this tutorial, you will learn how to create PHP project in XAMPP step by step, from creating the project folder to connecting PHP with MySQL.
In this beginner-friendly guide, you will learn how to create your first PHP project, save it inside the XAMPP
htdocsfolder, write a simple PHP program, and run the project using your web browser.
What You Need Before Creating a PHP Project
You will need:
- XAMPP installed on Windows
- Apache running in XAMPP Control Panel
- A code editor such as Visual Studio Code
- A web browser such as Chrome, Edge, or Firefox
- Basic knowledge of HTML
Step 1: Open the XAMPP htdocs Folder
Before you create PHP project in XAMPP, make sure Apache is running correctly in the XAMPP Control Panel.
After you install XAMPP, your PHP projects need to be stored inside the
htdocsfolder. This folder acts as the main document root for the Apache web server in XAMPP.Open File Explorer and navigate to:
C:\xampp\htdocsInside the
htdocsfolder, you may already see some default XAMPP files and folders. This is where we will create our first PHP project.Tip: Do not create your PHP project on the Desktop or Documents folder if you want to run it directly through XAMPP. Keep your project inside the
htdocsdirectory.
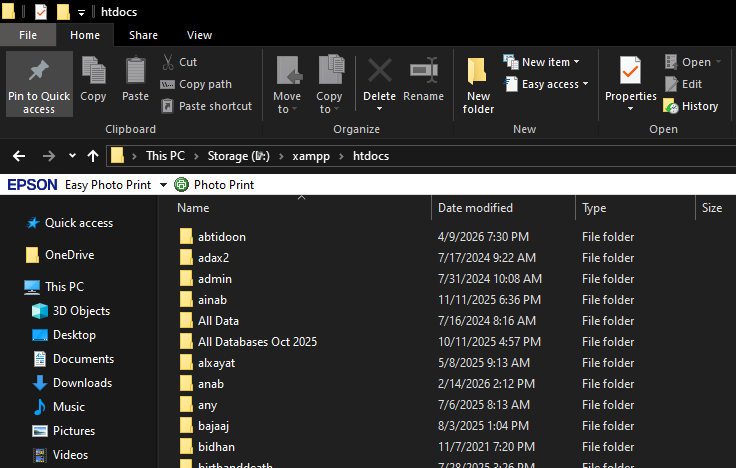
Now that you are inside the htdocs folder, the next step is to create a folder for your PHP project.
Step 2: Create Your PHP Project Folder
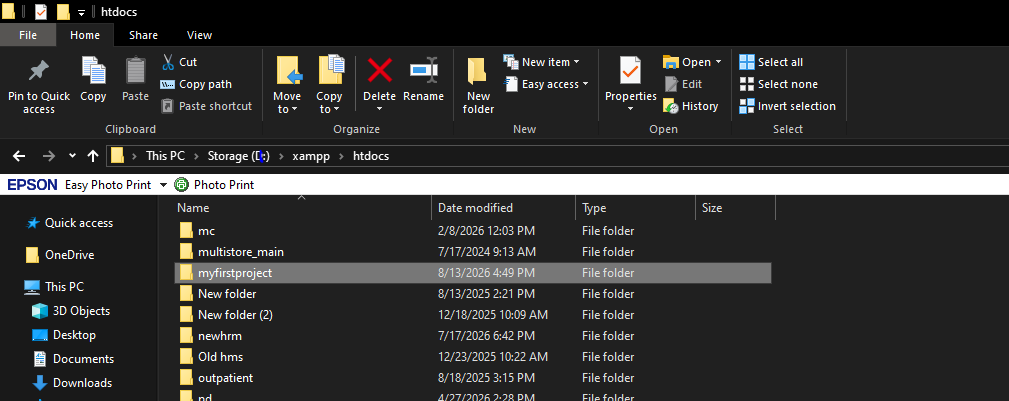
Right-click inside the htdocs folder and select New → Folder.
Name the new folder:
myfirstproject
Your project location should now be:
C:\xampp\htdocs\myfirstproject
This folder will contain all the PHP, HTML, CSS, JavaScript, and other files used by your project.
Tip: When naming PHP project folders, avoid spaces and special characters. Use simple names such as myfirstproject, student-system, or php-project.
Step 3: Create Your First PHP File
Now that your project folder is ready, the next step is to create your first PHP file.
Open the myfirstproject folder inside:
C:\xampp\htdocs\myfirstproject
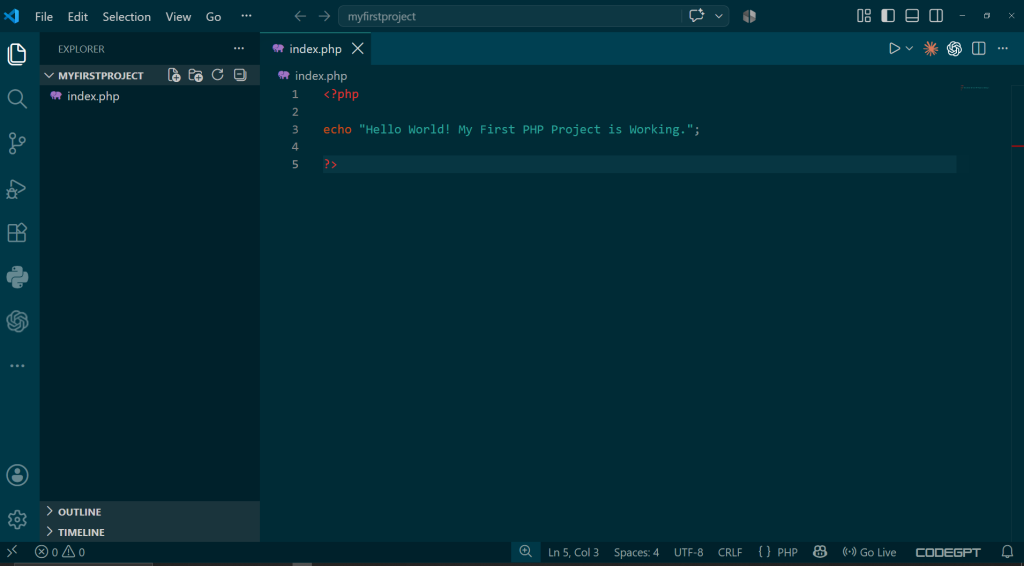
Create a new file and name it:
index.php
The index.php file will be the main page of our PHP project. When you open the project through localhost, the web server will automatically look for this file.
Important: Make sure the file is saved as index.php, not index.php.txt.
Step 4: Run Your First PHP Project in the Browser
Now that you have created the index.php file, it is time to run your PHP project in a web browser.
First, open the XAMPP Control Panel and make sure Apache is running.
Then open your web browser and enter:
http://localhost/myfirstproject/
Press Enter.
If everything is configured correctly, you should see:
Hello World! My First PHP Project is Working.
This confirms that Apache successfully processed your PHP file and displayed the result in the browser.
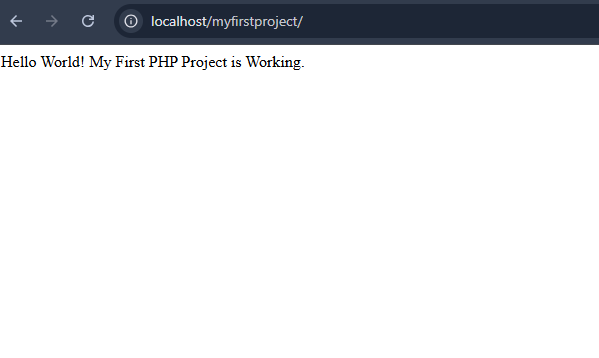
Running the first PHP project on localhost using XAMPP.
Step 5: Understand Your First PHP Code
Before creating more advanced PHP projects, it is important to understand the code you just wrote.
Our first PHP program was:
<?php

echo "Hello World! My First PHP Project is Working.";

?>
Understanding Each Part of the Code
<?php— Opening PHP Tag
This tells the web server that PHP code starts here. PHP statements are written after this opening tag.
echo— Display Output
Theechostatement is used to display text or other values on the web page.For example:
echo "Welcome to PHP";The browser will display:
Welcome to PHP
Quotation Marks
" "
Quotation marks are used when writing text (a string) in PHP.Semicolon
;
The semicolon marks the end of a PHP statement.
echo "Hello";Forgetting the semicolon can cause a PHP syntax error.
?>— Closing PHP Tag
This marks the end of PHP code. In files containing only PHP, the closing tag is often omitted, but beginners can use it while learning the basic PHP syntax.
Try Another PHP Example
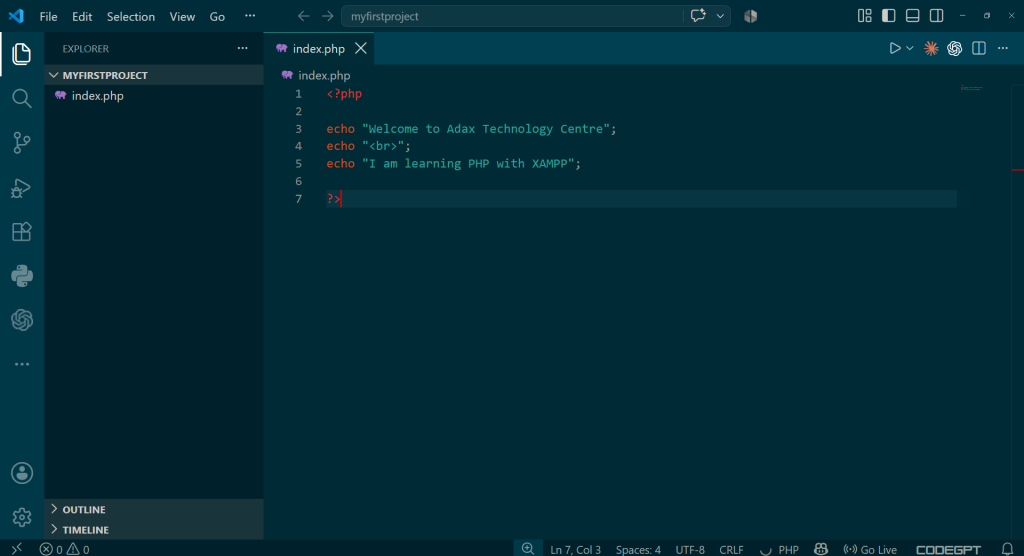
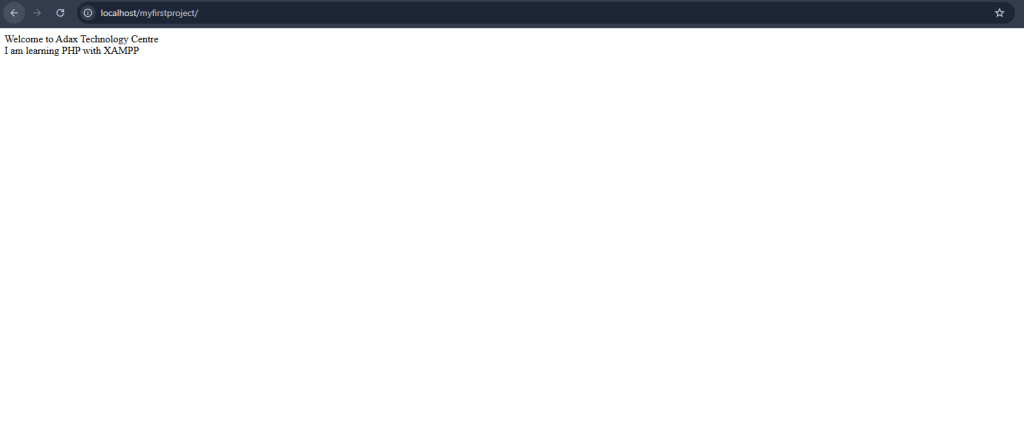
Displaying multiple lines of text using PHP echo.
Step 6: Combine HTML and PHP in One Page
PHP can be used together with HTML to create dynamic web pages. HTML is used to build the structure of the page, while PHP can generate dynamic content inside that page.
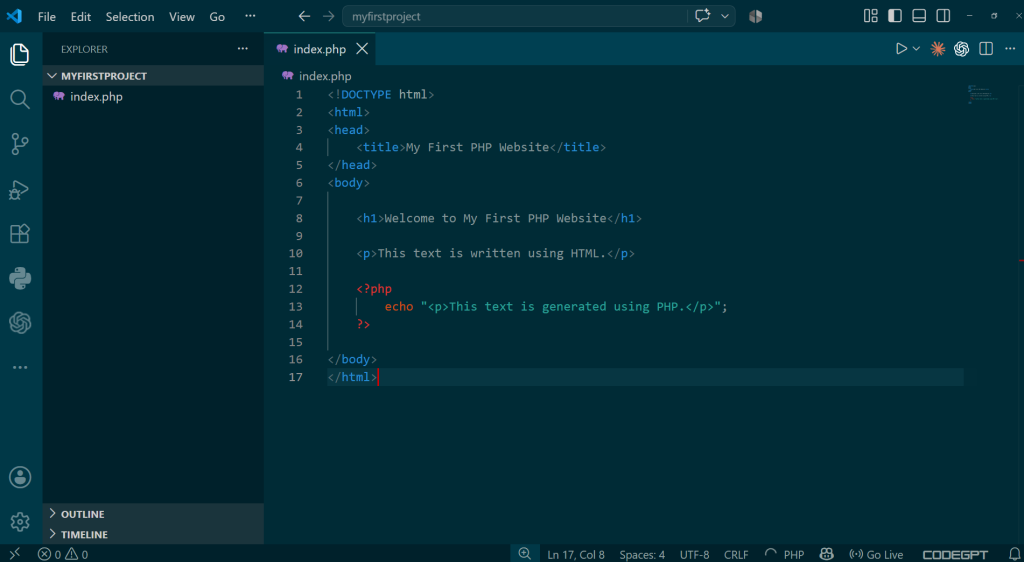
In this example, most of the page is normal HTML. PHP starts when the <?php tag is used and ends at ?>.
The browser receives the final HTML generated after PHP has been processed by the Apache server.
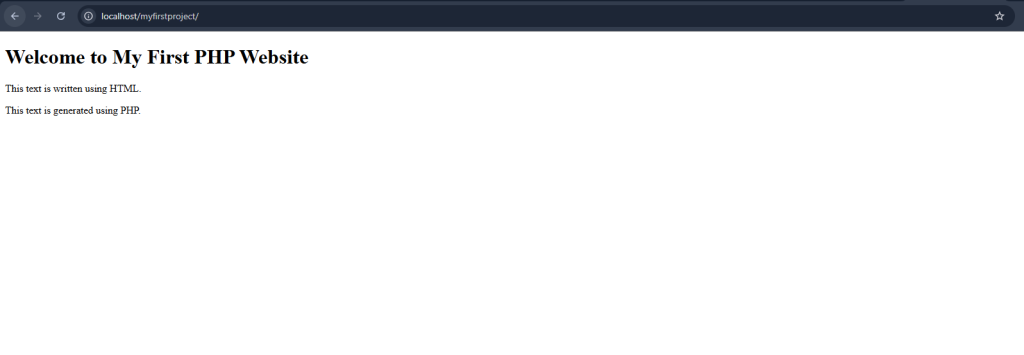
Combining HTML and PHP in the first XAMPP project.
Tip: A PHP file can contain HTML, CSS, JavaScript, and PHP code. This makes PHP useful for building complete dynamic websites and web applications.
Variables are used to store information that can be used later in a PHP program. A PHP variable always starts with the dollar sign $.
Step 7: Use PHP Variables with HTML
PHP variables can be displayed directly inside HTML to create dynamic web pages. This is useful when building pages such as student profiles, user dashboards, product pages, and management systems.
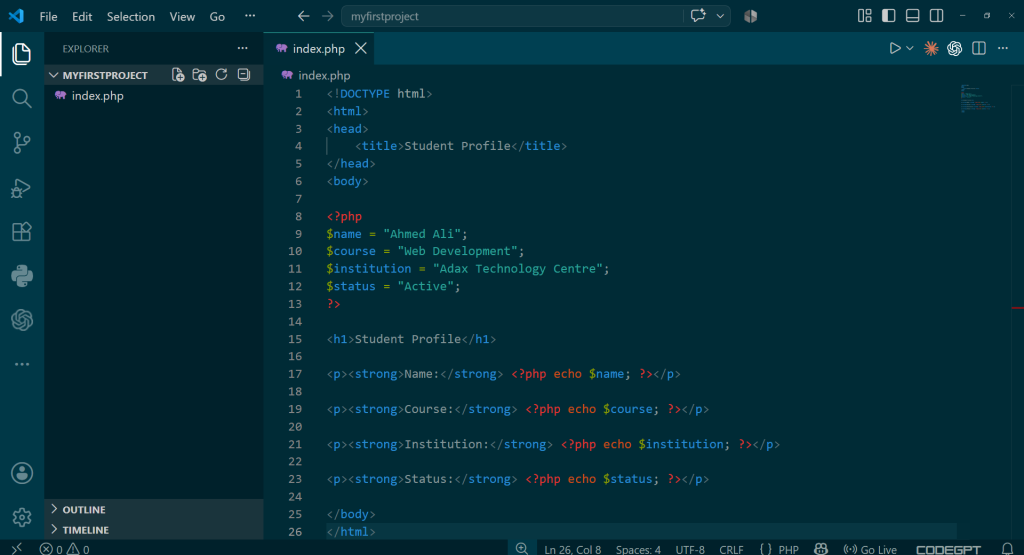
In this example, we will create a simple student profile using PHP variables and HTML.
How This Example Works
The PHP variables are created at the beginning of the page:
$name = "Ahmed Ali";
$course = "Web Development";
$institution = "Adax Technology Centre";
$status = "Active";
Each variable stores information that we can display anywhere on the page.
For example:
<?php echo $name; ?>displays the value stored inside the $name variable.
This means that if we change:
$name = "Ahmed Ali";to:
$name = "Mohamed Hassan";the student name displayed on the webpage will automatically change.
Test the Example
Replace the current code in your index.php file with the example above.
Save the file using:
Ctrl + S
Then open or refresh:
http://localhost/myfirstproject/
You should see:
Student Profile
Name: Ahmed Ali
Course: Web Development
Institution: Adax Technology Centre
Status: Active
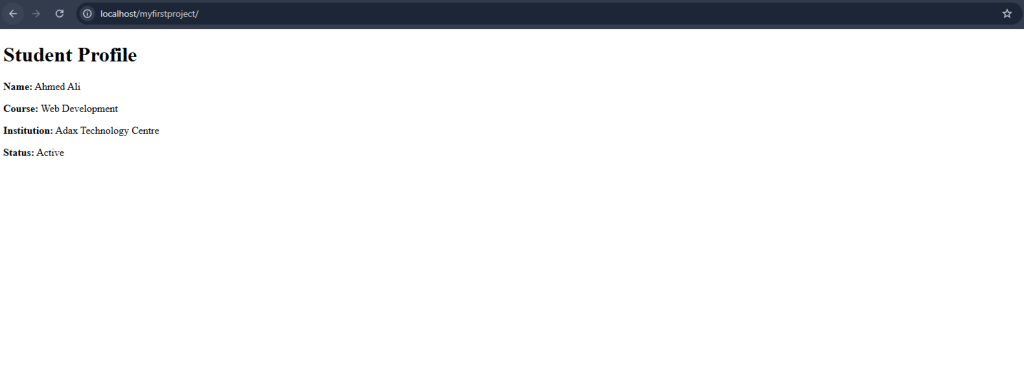
Displaying PHP variables inside an HTML student profile page.
Tip: Combining PHP variables with HTML is one of the basic techniques used to create dynamic web applications. Later, these values can come from forms, databases, user accounts, or other sources instead of being written directly in the PHP file.
Step 8: Create a Simple PHP Form
Now that your PHP project is working, you can create a simple HTML form and use PHP to process the information entered by a user.
In this example, we will create a form that asks the user to enter their name.
Create the Form
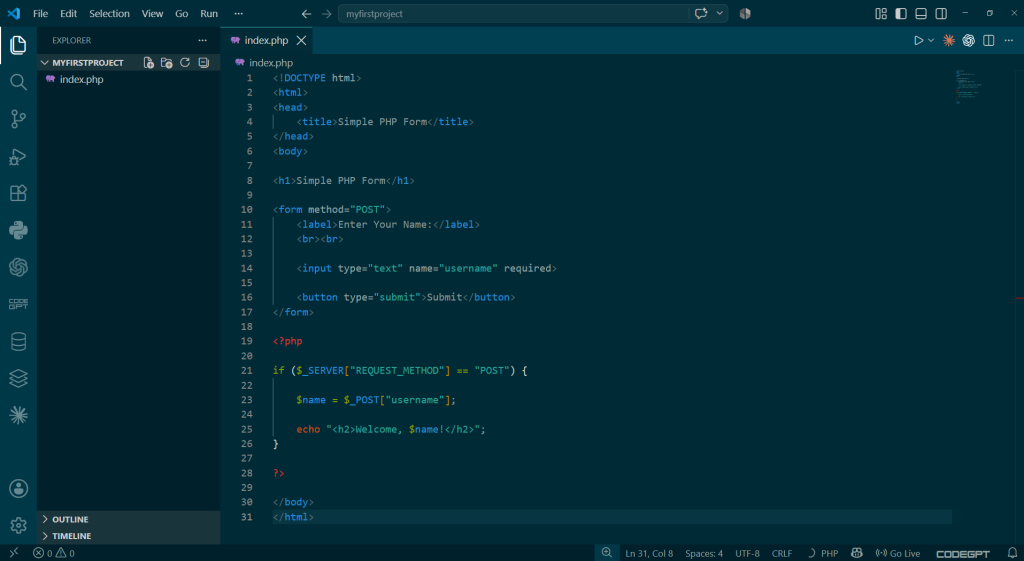
Replace the code inside your index.php file with the following:
How the PHP Form Works
The following code creates the HTML form:
<form method="POST">
    <input type="text" name="username" required>
    <button type="submit">Submit</button>
</form>
The user enters their name and clicks Submit.
PHP then checks whether the form has been submitted:
if ($_SERVER["REQUEST_METHOD"] == "POST")The value entered by the user is stored in the $name variable:
$name = $_POST["username"];Finally, PHP displays the user’s name:
echo "<h2>Welcome, $name!</h2>";Test the PHP Form
Save your index.php file using Ctrl + S.
Open or refresh:
http://localhost/myfirstproject/
Enter a name such as:
Ahmed
Click Submit.
The page should display:
Welcome, Ahmed!
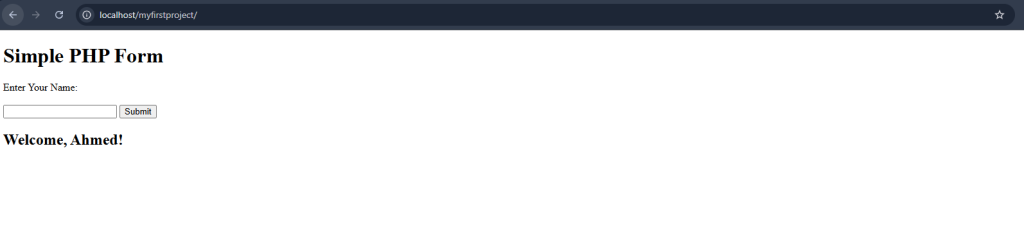
Creating and processing a simple HTML form using PHP in XAMPP.
Note: This is a basic learning example. In a real application, user input should be validated and escaped before being displayed or stored.
Step 9: Connect PHP to MySQL in XAMPP
Most PHP applications need a database to store information such as users, students, products, or other records.
XAMPP includes MySQL/MariaDB and phpMyAdmin, which allow you to create and manage databases locally.
Before connecting PHP to MySQL, make sure both Apache and MySQL are running in the XAMPP Control Panel.
After you create PHP project in XAMPP, you can connect the project to MySQL and start building database-driven applications.
Create a Database in phpMyAdmin
Open your browser and visit:
http://localhost/phpmyadmin/
Click New on the left side.
Enter the database name:
myfirstproject_db
Then click Create.

Creating the myfirstproject_db database in phpMyAdmin.
Connect PHP to the Database
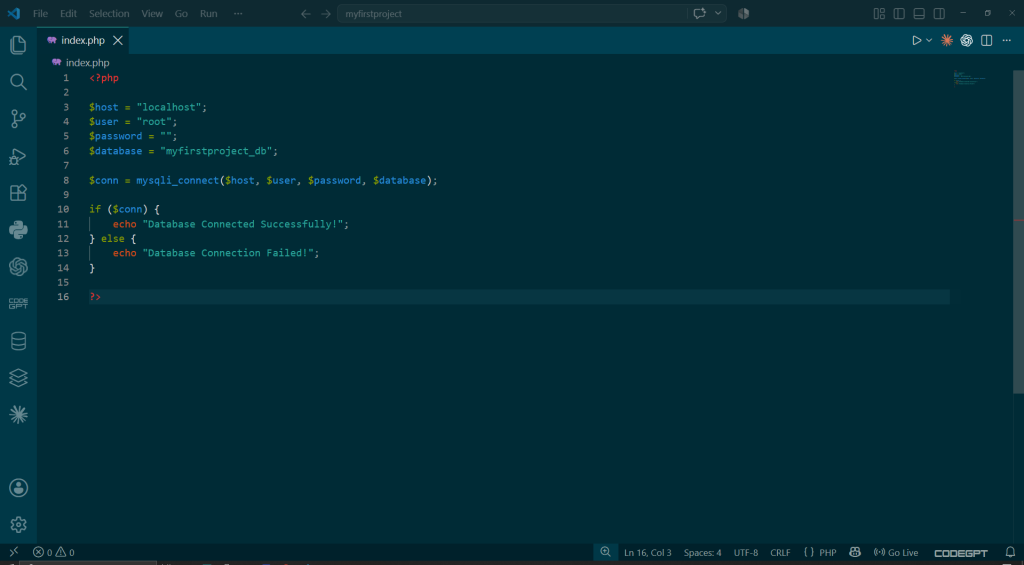
Open your index.php file and use the following code:
Understanding the Connection
The following variables contain the database connection information:
$host = "localhost";
$user = "root";
$password = "";
$database = "myfirstproject_db";
localhost tells PHP that MySQL is running on the same computer.
root is the default MySQL administrator username commonly used in a local XAMPP installation.
The password is empty in a default local XAMPP setup:
$password = "";The database name must match the database you created in phpMyAdmin:
$database = "myfirstproject_db";The connection is created using:
$conn = mysqli_connect($host, $user, $password, $database);Test the Database Connection
Save index.php using Ctrl + S.
Then open:
http://localhost/myfirstproject/
If everything is configured correctly, you should see:
Database Connected Successfully!

Successfully connecting PHP to a MySQL database using XAMPP.
Note: The empty root password shown here is suitable only for a default local development environment. Production websites should use dedicated database users and strong passwords.
Step 10: Insert Data into MySQL Using PHP
Now that PHP is connected to the MySQL database, the next step is to create a table and insert data into it.
Create a Students Table
Open phpMyAdmin:
http://localhost/phpmyadmin/
Select the database:
myfirstproject_db
Create a new table named:
students
Add these columns:
id– INT, Primary Key, Auto Incrementname– VARCHAR(100)course– VARCHAR(100)
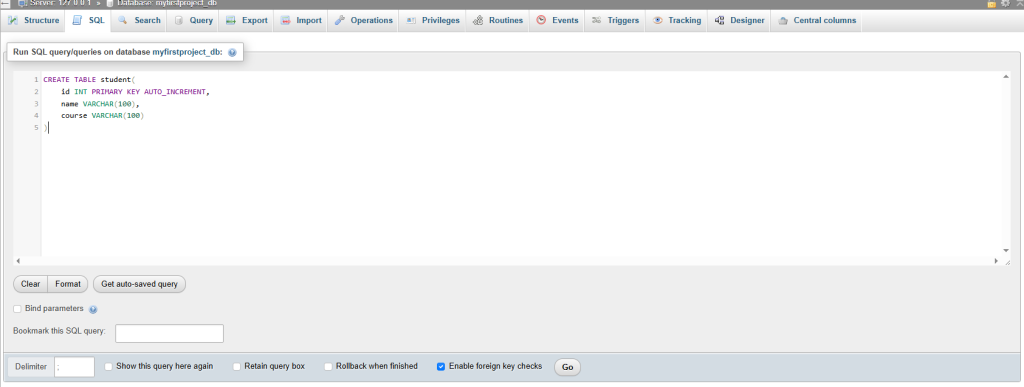
Creating a students table inside the MySQL database.
Insert Data Using PHP
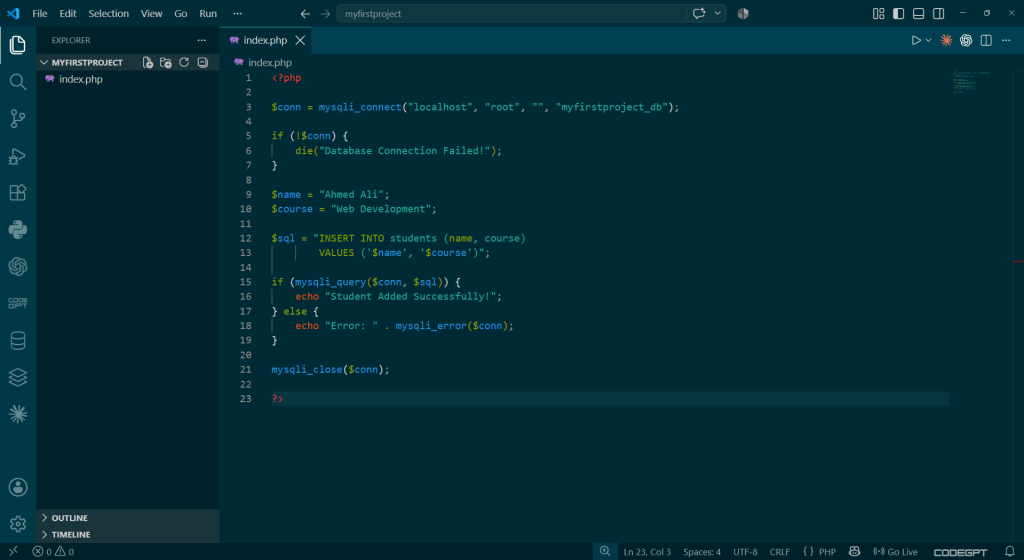
Replace the code inside index.php with:
How the Code Works
This SQL statement inserts a new student into the students table:
$sql = "INSERT INTO students (name, course)
        VALUES ('$name', '$course')";
The following code executes the SQL query:
mysqli_query($conn, $sql);If the query runs successfully, the browser displays:
Student Added Successfully!
Test the Insert
Save the file using Ctrl + S.
Open:
http://localhost/myfirstproject/
You should see:
Student Added Successfully!
Then open phpMyAdmin and browse the students table.
You should see the new student record.
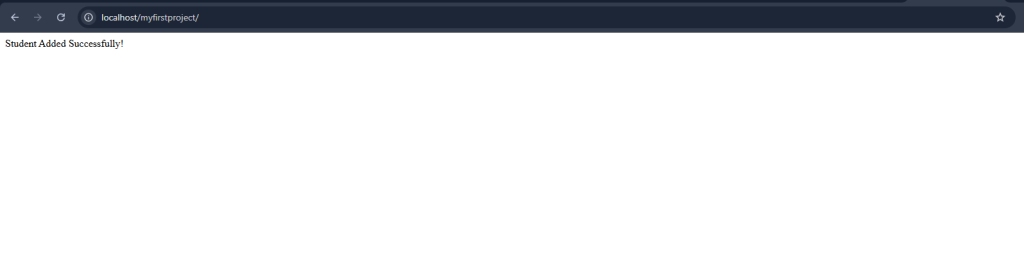
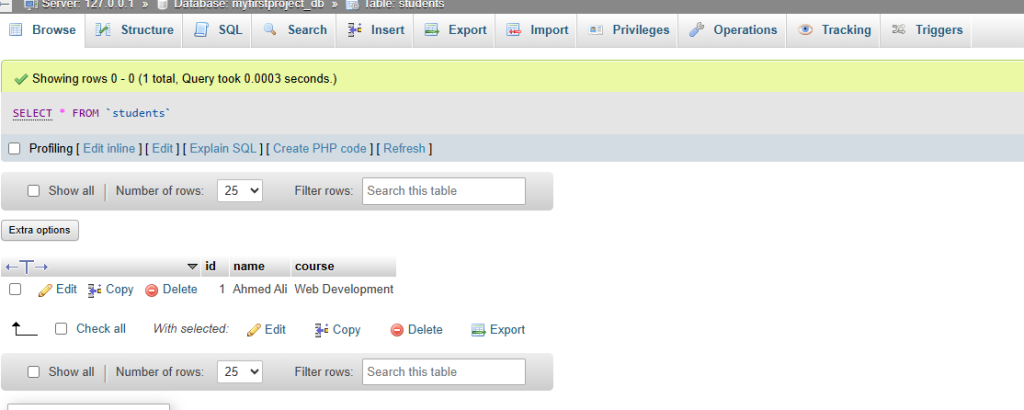
Successfully inserting student data into MySQL using PHP.
Important: This example is intentionally simple for learning. In real applications, use prepared statements instead of directly placing values inside SQL queries.
What You Have Learned
By completing this tutorial, you have learned how to:
- Create a PHP project inside XAMPP
- Create and run an
index.phpfile - Display output using PHP
- Use PHP variables
- Create and process an HTML form
- Create a MySQL database using phpMyAdmin
- Connect PHP to MySQL
- Create a database table
- Insert data into MySQL using PHP
After completing these examples, you should be able to create PHP project in XAMPP and understand how PHP, Apache, and MySQL work together.
Conclusion
You have successfully created your first PHP project using XAMPP and connected it to a MySQL database.
You now understand the basic workflow used by many PHP applications:
Browser → PHP → Apache → MySQL → Result
These skills provide a strong foundation for building more advanced systems such as student management systems, hospital systems, inventory systems, login systems, and other database-driven web applications.
You now know how to create PHP project in XAMPP, run PHP code, process forms, and connect your project to a MySQL database.
This method makes it easy for beginners to create PHP project in XAMPP without using a live web server.
Once you understand how to create PHP project in XAMPP, you can start building more advanced PHP and MySQL applications.
Practicing these steps will help you create PHP project in XAMPP confidently and understand how local PHP development works.
You can also visit the official PHP documentation to learn more about PHP and server-side web development.
For help installing and configuring XAMPP before starting this project, read our How to Install XAMPP on Windows 11 tutorial.